categories

people
craft
music
art
food
film
oh comely
community

Scrapbook Memories: Californian Dreaming

words Hannah Bailey

28th July 2014

When I was twelve I went to America for the first time, and I was amazed. Through my young, fresh eyes everything looked different and was a novelty. I wasn’t sure if I’d return, so at the time I collected everything. Ticket stubs, sugar packets, flyers and hotel notepads were all keepers. It was before I had a phone or a digital device that could record my experiences, so these scraps were to be my souvenirs and my way of documenting the trip of a lifetime.

Fast forward to 2014, and we document every day of our lives, let alone just holidays, through digital means. So when it came to my trip to California last month, I decided to revisit the paper way of doing things by documenting my travels in a scrapbook. After three weeks on the road, 1000 miles covered and southern California checked off my bucket list, I was left with a tattered book full of scraps and a plethora of memories to accompany them.


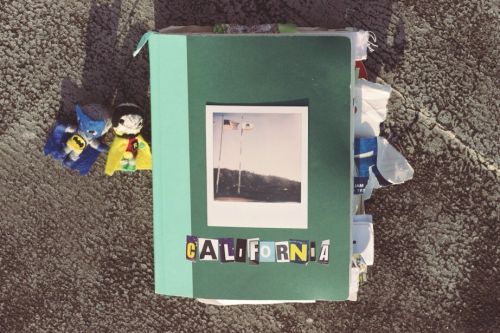
I got this sketchbook from Magma. It was the perfect size to carry around on my travels and durable enough to be chucked around in bags. It had the important job of holding together three weeks of memories for a lifetime. You shouldn't judge a book by its cover, but this one made a good start.


Diners every day. This sugar-coated page reminds me of the many American breakfasts we had. French toast and pancakes, with never-ending coffee: "refill honey?". This particular breakfast was on a Sunday and the comic books were my entertainment as I filled up.


Live on the sweet side. So states Red Vines, my favourite sweet of the holiday. This page was after an inspirational day photographing and filming some amazing American skaters for a project. Lacey Baker, Allysha Bergado and Lizzie Armanto were all instantly snapped in black and white polaroid. Inspiration.


Stay Wild. We camped all around California. It was hot out and easy to find wilderness away from the city to call home for the night. Here we were at Joshua Tree, one of my highlights from the trip. Surrounded by massive boulders, chipmunks and miles of desert, it was trippy. The Impossible Project polaroid film with animal skins was accidental but a fitting way to document the wild view.

While in Palm Springs we stayed at the Ace Hotel, and it was like going back in time to a 40’s vacation. We even won the bingo. Hotel stationary is great to collect for a scrapbook and the Ace vibe was particularly creative so worthy of a full page. The perfect place to stay for a true-desert US vacation.

On one day we headed south of LA to El Segundo Museum of Art for the opening of a street art exhibition. It was huge, with big-named artists painting indoor walls for once. Unprepared, I asked illustrator Gorgs, who was part of the show, to sketch something on a brown paper bag for me. He created this.


Palm trees are everywere in Cali, so you can’t fail to mention them. Providing daily inspiration and reminding you at all times that you're in California, I never tired of them. These particular ones line the takeout bag of the infamous burger joint, In-n-Out.


Californian dreaming; this scrapbook will keep the memories alive.

Announcing Oh Comely's Most Excellent 'Work-Shop' Designers

words Emma Carey

20th June 2014

Earlier in May, we offered designers and artists the chance to win a place in our July pop-up, Work-Shop, that we're running in collaboration with Michelle Oh.

It wasn't a simple decision process, by any measure, and having climbed out of the mass of excellent submissions you sent in, we are pleased to announce that the designers who will be showcasing their work with us at Work-Shop, will be as follows:

SaadiqahA designer of striking, polished metal neck pieces that have an abrupt and beautiful geometry about them.

Dorry Spikes: An illustrator based in Wales who is inspired by travels and the stories she hears along the way.

Jubilique and Louise: Founded by Abbi Cudden, Jubilique and Louise are all about quirky, handmade and paper homewares.

More about our collaboration with Work-Shop is coming soon! For now, follow the Facebook page for updates. 

In Praise of Work-Shop's Craft Classes

words Emma Carey

19th June 2014

What could you do in an hour? Eat lunch? Make 60 cups of tea? Carnaby pop-up, Work-Shop, has seen designer Michelle Oh teach jewellery-making in just an hour. We've been amazed by some of the beautiful work participants have created so far. This June, Michelle's classes are on the following days:

June 21st: Gold ring workshop, £60.
June 24th: Silver earring workshop, £30.

Email [email protected] to book your place. Other participating designers in Work-Shop are running classes, too, from leather-worker Elizabeth Dunn to the London Tea Club. The full calendar is listed here.

Follow Work-Shop on Facebook to keep up to speed on the project, and listen out for details of our forthcoming take-over of the space!

Sponsored Post: V&A Workshops

words Tamara Vos

22nd May 2014

Have you finished all your box sets? Completed your paint-by-numbers? Are you twiddling your thumbs for what to do next?  

The V&A runs some spectacular workshops that cover everything from couture beading to floristry to getting the most out of your iPad. Informal workshops that are led by professionals, it's the perfect opportunity to pick up a new hobby or learn a new skill, and at the end of it all you walk away with a full sketchbook, Photoshopping skills or a freshly penned romance novel. 

New workshops are scheduled in constantly and they book up quickly, so keep your eyes peeled. For more information see here

Paper Personas

Story in Stitch

Summer Holidays in Stitch

Fables and Fairytales

Photos: V&A

Say It With String

words Hannah Bailey

15th May 2014

Do you have a favourite word? A lovely lyric? A strong statement you'd like to put out to the world?

Say it with string! 

This quick little craft project is easy to make, and will add a pretty little something to your room in celebration of your favourite words. 

You will need: 

A piece of wood board
Nails
Colourful string or yarn
Tracing paper
Masking tape
A hammer

One. Decide what word you would like for your sign. We went with the Oh Comely logo which was a tricky one to try. The more block the font the better! But we like a craft challenge…

Two. Trace your word, either freehand or from a printout, and then attach it on to the wood using the masking tape.

Three. Hammer in the nails at the corner points, the more block the letters the easier it is to do this. Our calligraphy style font meant we had to hammer in nails at lots of points to make a curve.

Four. Make a loop knot to attach the string around the starting nail and begin to wind it around, weaving tightly.  As we were using quite tall nails we decided to wrap it round about 4 times, to give it a 3d look! Securing the end with another knot. Some of our letters were joined together making it a little trickier!

Five. Cut off any bits of excess string.

Six. Remove the tracing paper (although this would be easier to do before putting the string on!).

Seven. Your string makes a statement. Ready to hang on the wall and speak to people.

Photos: Hannah Bailey

Head-to-Toe Tie Dye: The Crumple Coat

words Hannah Bailey

3rd April 2014

Our tie dye series is from Issue Nineteen of Oh Comely. You can buy the issue here, or subscribe here.

In the last post of this series, we will show you how to transform a sad old raincoat into a piece that's ready to party come rain or shine. We chose to dye a coat, but this method can be applied to pretty much any piece of clothing; the trick is to keep the crumples tight. 


You Will Need: 

A light, spring coat, or a garment of your choice
Two dyes in different colours
Two squeezy bottles with nibs
A plastic sheet or large bucket
A plastic bag
Rubber gloves

One. Soak your coat in a salt solution, following the instructions on your dye packet.

Two. Prepare the dyes in squeezy bottles according to the instructions on the packet. We used a quarter sachet each of Dylon's Antique Grey and Dylon's Tropical Green, each mixed with 100ml of warm water. Shake it up well. 

Three. Remove the jacket from the salt solution and wring out any excess water. Place on a plastic sheet or large bucket. Shape the material into a flat circle (not a ball), tightly crumpling it in places. The tighter the crumples, the better! 

Four. Cover the crumpled circle fully in the lightest dye colour first. Flip over and do the same with the other side. 

Five. Open the crumple out. Carefully recrumple it, exposing as much white fabric as possible. Grab your second colour, apply the dye, flip and repeat. 

Six. Have a little peek in the creases of your coat to see if there's much white remaining; cover it with dye if there is. Maintaining the crumple, place your garment in a plastic bag and leave it somewhere warm. 

Seven. After 24 hours, remove your coat from the bag and rinse thoroughly until the water runs clear. Hang to dry, and get ready to wear! 

Read more in this series: The Bleached Black Jeans, The Swirly Pocket Tee, The Stripy Scarf.

Photos: Liz Seabrook

Head-to-Toe Tie Dye: The Bleached Black Jeans

words Hannah Bailey

27th March 2014

Our tie-dye series is from Issue 19 of Oh Comely. You can buy the issue here or subscribe here

You don't always need to add colour for a successful tie-dye. This week, we're showing you how to remove existing colour with bleach to create some subtly-patterned jeans, proving that tie-dye doesn't always have to come in primary shades and "the hippy five colour swirl". 

You Will Need: 

A pair of black jeans
Bleach
Duct tape
Rubber gloves
Washing up bowl
Sponge

The Bleached Black Jeans

One. Pull on a pair of rubber gloves and dilute the bleach with water in a washing up bowl. The stronger it's kept, the stronger its effect, but it could damage the fabric of your jeans. One part bleach to ten parts water is a good place to start. 

Two. Prepare your jeans. We applied strips of duct tape around the bands that we wanted to keep black, and to cut off the dip dye from the bottom. 

Three. Dip the bottom of your jeans into the solution, and leave to soak for around 40 minutes. Upon returning, you should see that the bleach has started to work in removing the black, most likely revealing orange! 

Four. Wearing gloves, take a sponge, dip it into the solution and dab it wherever you want. If you're only doing a dip dye, just use the sponge to fade the dip dye up the legs, so it's less severe. If you want to be more precise, you can use a paintbrush. Layer it up so it's really soaked with bleachy water. 

Five. Let the bleach soak in for another 40 minutes in a well ventilated area. 

Six. Rinse thoroughly and chuck in the washing machine. 

Read more from this series: The Stripy Scarf, The Swirly Pocket Tee

Photos: Liz Seabrook.

Head-to-Toe Tie Dye: The Swirly Pocket Tee

words Hannah Bailey

20th March 2014

Our tie dye series is from issue nineteen of Oh Comely. You can buy the issue here or subscribe here.

The tie-dye bonanza continues. This week, we're showing you how to make a swirly, colourful pocket that'll give any old tshirt a new lease of life. 

You Will Need: 

A small square of cotton fabric
2 sachets of dye in colours of your choice
Rubber gloves
Two bottles with squeezy nibs
2 elastic bands
1 freezer bag
A tshirt of your choice

The Swirly Pocket Tee

One. Prepare a small square of fabric. Ours is about 20cm x 20cm. It can be plain, or if you're a dab hand at embroidery, go wild! Emma Ruth Hughes did ours. 

Two. Soak your patch in a salt solution according to your dye packet instructions, then wring out. Prepare the dyes in the bottles to the instructions on the packet. We used 1/4 sachet of Dylon's Bahama Blue, and 1/4 sachet of Dylon's Sunflower Yellow. 

Three. Pinching the centre of your patch, twist the fabric around into a tight whorl. This will be a bit fiddly; the key thing is to keep it tight. As with all tie dye, it doesn't have to be super neat!

Four. Secure your swirl with elastic bands, crossing length and widthways to cut the patch into quaters. 

Five. Carefully squeeze your first dye into two opposite quaters, making sure you get right into the creases. Grab the other dye, and do the same with the other quaters. Place in a freezer bag, and leave for 24 hours in a warm place. 

Six. After 24 hours, unfold and rinse thoroughly until the water runs clear, and leave to dry. Your patch is now ready to sew onto your chosen t-shirt!

Read more from this series: The Stripy Scarf.

Photos: Liz Seabrook.